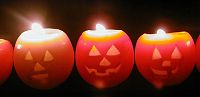
This project is nothing but fun! It is NOT a project for kids: hot wax and Exact-o knives are very dangerous. We made one of a kind jack-o-lanterns this time, but check out our great ideas for other occasions--maybe even no occasion at all. Add our essential oils for really fun aromatherapy candles. Get ready to light up the night!
What You'll Need:
- Candle-wax: Available in many forms at craft stores. You will need about 1-lbs. per candle.
- Color: Made for candle and soap making. You can also use crayons. We used orange and yellow.
- Candle wicking: Use wire-coated candle wicking that has a metal wick stand on the bottom. These need to be at least 3-inches long and one per candle.
- Round water balloons: approximately 2 1/2-inches in diameter when filled.
- Vegetable Oil Spray
- Essential Oils of your choice
- Piece of old pantyhose
- Black fine point marker
- Two 26-oz. cans, empty, clean, and dry: These must be large and deep enough to dip an entire filled balloon into. Use one for melting each color of wax.
- Exact-o knife
- Large pot: DO NOT use one you use for cooking. No matter how hard you try, you will get wax on it. (Garage sales and thrift shops are a great source for these.)
- Wire rack or metal trivet that will sit firmly on the bottom of the pot. Sticks for stirring wax, one for each color: Disposable chopsticks or wooden paint stirrers work great.
- Newspapers: Best to put an old vinyl tablecloth down and cover it with at least five layers of newspapers. Then cover all with butcher paper to keep newsprint from staining candles. Lay newspaper on the floor between the stove and worktable too.
- Old Potholders and hot pads
- Old pizza pan or cookie sheet
- Several old dishtowels or hand towels
- Several rubber bands
- Large bowl
1. Set up your work area. Put the newspapers and butcher paper on the table and floor. Put hot pad and candle wicking on the table. Fill the pot with water to a depth of about 1/2 the cans' height. Place the trivet or rack on the pot's bottom. Set the pizza pan next to the pot along with the potholders, a couple of dishtowels, rubber bands, and chopsticks. Fill each can about 3/4 full of wax. Follow the manufacturer's instructions for melting. In general, break the wax into chips or small blocks to help it melt faster. Pinch the top of one side of one can together so that it forms a spout.
2. Fill the water balloons with cold water and tie them tightly shut. Dry them off and spray them with vegetable oil. Put them in the bowl and place it in the refrigerator.
3. Turn the burner to medium-high and bring water to a rolling boil. Set the can of wax without the spout on the trivet in the pot. DO NOT LEAVE MELTING WAX UNATTENDED. Stir the wax until it begins to melt, and then lower the heat to medium. As water boils out of the pot, add more. Stir until the wax is completely melted, add the outside color, and a few drops of essential oils. Mix thoroughly.
4. CAREFULLY, lift the can out of the water and set it on the pizza pan. Turn off the burner. Fold the dishtowel until it is half the height of the can. Very carefully, wrap the dishtowel around the bottom half of the can and secure with rubber bands.
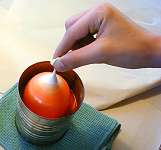
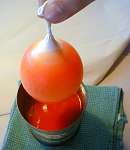
5. Set the bowl of water balloons on the table. Carefully carry over the melted wax. Dip a balloon into the wax to about an inch from its top. Lift out and hold over the can for several seconds. Continue dipping until the coat of wax is 1/4-inch thick. Set the coated balloon down on the butcher paper and press gently for a few seconds until it stands on its own. Dip the rest of the balloons and let them cool. Break the water balloons over the sink with a knife or scissors to drain remove the balloon. Return the wax shells back to the table.
6. Add water to the pot if necessary and bring to a boil. Add the can of wax with the spout, and repeat the melting process above adding the inside color and essential oils.
 7. The shells need to be filled carefully in increments and allowed to cool between each addition to keep the hot wax from melting them. Slowly pour a little of the melted wax into each shell. When wax is semi-soft, add the wicks, and let cool for about 5-10 minutes. (Putting them in the refrigerator will speed up the cooling process.) Keep adding melted wax in increments until filled to about 1/4-from the top. You will have to re-melt and melt more wax to finish filling them. Check them often while cooling and gently pull the wicks straight if necessary.
8. When filled and cooled, dip each one into a bowl of ice water. This helps give them a gloss.
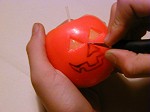 9. Draw a jack-o-lantern face on each one with the marker. Carefully carve the face out from the outer layer with the Exact-o knife. Polish away any imperfections or marks with the pantyhose.
10. Trim the wicks to about 1/2-inch, and you're done. Make sure to place them on a small saucer when burning since wax may drip out of the carved faces.